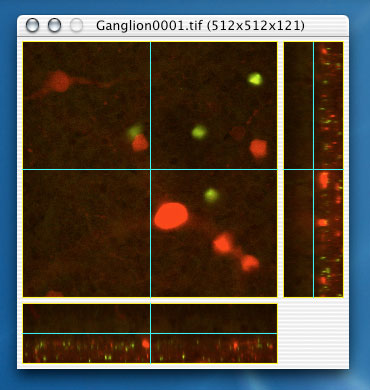
The input images are shown in a SectionView window.
The SectionView consists of three cross sectional views; one seen from the front, one from the bottom, and one from the right. These cross sections are taken along the light blue lines. To view different cross sections, move appropriate blue lines by mouse.
You can choose the view magnification from between 25% and 400%. This is only concerned with how images are displayed, and has nothing to do with the internal data of the image.
You can specify the scaling factors in x-, y-, and z-directions independently. For instance, if a given image is compressed in the z-direction, you can specify z-scale to be greater than 1 to correct the scale in the x, y and z coordinates.
In contrast to the View menu above, this sets magnification against the internal image data. Writing out images after scaling saves actually scaled images. The Mesh Size stated below also gets applied to transformed data.
It is a subtle point about scaling images but the scaling is applied to the intervals between pixels. For instance, assume that ten images are read in, then the distance between the first and last images is 9. If z-scale = 2, this distance becomes 18, therefore not 20 but 19 images will be saved when written to files.
The image can be flipped left to right, top to bottom, or front to rear. By default, DeltaViewer assumes that the image files are numbered from the rear toward the front. If the given images are numbered in the reverse order, choose Flip Front/Rear menu.
This menu is used to align images. Refer to the Align section.
This menu is used to colorize images. Refer to the Colorizer section.
Cancel any transformations done by Scale Images, Flip Images, Align Images, and revert the image to the original state.
This negates the image color. It can be used for instance when reconstructing a dark colored part of an object gives too dark a surface.
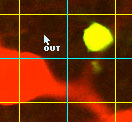
In SectionView, pressing Shift key changes mouse pointer to an arrow with letters "IN". While holding down the Shift key, click inside of an object. Next press Option key, and the mouse pointer changes to an arrow with letters "OUT". While holding down Option key, click outside of the object. Now a pink boundary line should appear around the object.
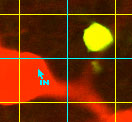
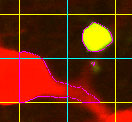
If the chosen object is too small or too thin, you may need to use Mesh Size menu and make the value smaller. If the boundary does not appear as you want, add some more inside and outside points. Usually 2 to 5 clicks are enough to set the desired boundary.
The last click can be cancelled by Undo Color Selection menu, or the Delete key. Pressing the Delete key more than once, you can cancel as many color selections as you want. To cancel all the clicks, use Clear Color Selection menu, or press the "C" key.
DeltaViewer determines the boundary of objects only from the color information. Mouse clicks actually records the color of the clicked point. Therefore, by carefully choosing points which are slightly brighter and ones that are slightly darker than the desired boundary color as inside and outside respectively, one can specify the boundary accurately.
If two objects have the same color, you cannot make one inside and the other one outside of a selected region. This becomes a problem in particular when grayscale images such as ones from electron microscope are used. If you want to reconstruct a specific object among several ones of the same intensity, color the object (or everything else instead) using some image processing software like Photoshop before reconstruction
There are a few things which affect the boundary, and consequently the final 3D view.
You can clip out the region to reconstruct. Specify the center of the region by the blue lines, and its boundary by the yellow lines.
The larger value implies the smoother surface, but also means the less detail. If Alpha=0, no smoothing is performed.
Usually the default value of Alpha=1 should be fine, but you might want to choose Alpha=2, or even Alpha=3. Choosing larger alpha greatly increase time to process data, but unlike the Mesh Size below, it does not increase the number of OpenGL polygons. So the final 3D view can be rotated as smoothly regardless of the specified alpha.
DeltaViewer internally divides the specified region into small cubes. You can specify how fine these cubes are by the Mesh Size menu. This greatly affects the final 3D view. The smaller the number is, the more detailed becomes the final 3D view, but also jerkier becomes the motion. The initial Mesh Size is set to 10. You should experiment with different values.
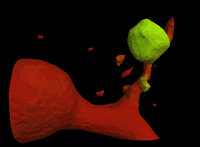
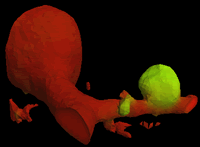
After you have adjusted the trim region, Smoothness and Mesh Size, select 3D Reconstruction. The 3DView window appears and shows the progress. When all the processing is done, a sound is heard.