Images taken from a serial section are in general randomly framed and cannot be used directly for 3D reconstruction; they need to be aligned beforehand. DeltaViewer has functions to support this alignment process.
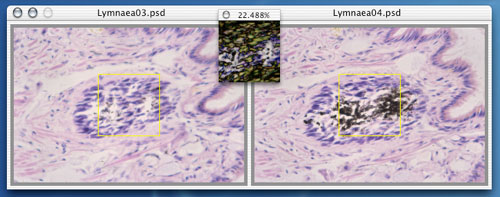
First, read in non-aligned images as they are. Choosing Align Images menu in SectionView shows an alignment window like this.
The magnification of images in this window is the same as that in SectionView. So, adjust magnification if necessary by the View menu before choosing Align Images. In any case, the alignment window will never be larger than the screen size.
Shown on both sides are two consecutive images from the serial section.
The yellow square bounds the alignment region. This square can be freely made larger or smaller by mouse.
Near the top of the window's center is the difference window. This window shows the difference of the two images. The darker image in this window means the images on both sides are more matched. The difference between the two images is also shown numerically in the upper bar of the difference window. Choosing Show Difference menu toggles between showing and hiding the difference window. If the size of yellow square is changed, the size of difference window also changes accordingly.
Mouse dragging in the alignment window translates the image. Dragging the image on the left actually translates all the images whose number is smaller than that of the left image, and dragging the image on the right translates all the images whose number is greater than that of the right image. Command-dragging translates all the images at the same time.
Option-dragging in the alignment window rotates the image. As in translation, rotating the image on the left actually rotates all the images whose number is smaller than that of the left image, and rotating the image on the right rotates all the images whose number is greater than that of the right image. Command-Option-dragging rotates all the images at the same time.
The Next and Back menus, or equivalently the right-arrow and left-arrow keys, allow navigation to any two consecutive images in the stack.
Missing slices in serial section are represented by plain black images. To skip such images during image alignment, use Skip menu. You can skip more than one image.
Translations and rotations by mouse dragging, and other actions via menus and keys can be undone by the Undo menu, and you can also Redo the undone action later. DeltaViewer supports unlimited number of Undo's and Redo's in alignment window.
DeltaViewer is equipped with a function to automatically align two images. By choosing Auto Align menu, or hitting Return or Enter key, DeltaViewer tries to match the region of the left image bounded by the yellow square with that of the right image by rotation and translation of the right image.
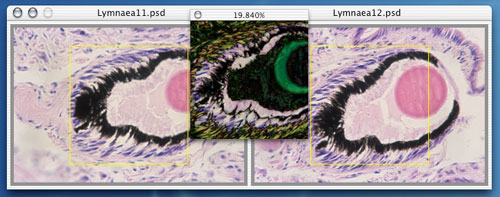
For instance, choose Auto Align menu when the alignment window is as above. And, a few seconds later, the window becomes as shown below, accompanied by a notification sound.
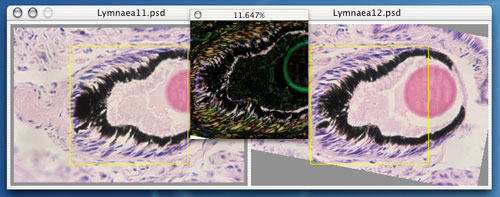
The alignment algorithm works quite well in most cases, but there are times when it fails. The algorithm somehow tries to align images by as small rotation and translation as possible. Therefore, it can help if you align the images by hand before choosing Auto Align.
When all the two consecutive images are aligned, choose Apply Change menu. You can also cancel alignment by Discard Change menu.
Before Apply Change is done, DeltaViewer simply records rotation angle and translation vector for each image, and does not actually transform the images themselves. Thus performing one transformation after another does not degrades the image quality. Note however that Apply Change actually replaces the original images by transformed ones, and repeating it could degrades the image quality. To retain as much information of the original images as possible during alignment, you may first use Scale Images and magnify the images in the x and y directions, apply Align Images, and then use Scale Images again, this time to reduce the images in the x and y directions to their original magnification.
If translation or rotation is performed while some images are skipped between the left and right images, the transformation is also applied to the skipped images proportionally to their location. Applying this, one can translate or rotate several images evenly. First skip the desired number of already aligned images. Then translate or rotate one of the images in the window, and the skipped images inbetween are evenly translated or rotated. You can use Unskip menu afterward to revert from the skip state.