Texture Mapping
Vertex Color
Reconstructed image via 3D Reconstruction menu is displayed in a 3DView window.
The image can be rotated by mouse dragging. It keeps rotating if mouse button is released within a few seconds. To stop rotation, simply click on the image.
To magnify or minify image, use the upward and downward arrow keys, or the Zoom menu.
This function reduces unwanted glittering effect around the outline when rotating objects in 3DView. The menu setting is ON by default, but the function is valid only when it is supported by the video card.
The default menu setting should be fine in most cases, but manually turning it off may allow you to use a bigger window. When rotating a 3D image of very large size, disabling the function could make the motion smoother.
Anaglyph is a method of viewing stereographic images by using red-blue glasses. Simply turn on Anaglyph menu and you can view any 3DView in Anaglyph mode. Try adjusting colors, parallax, focus, etc. using Color Adjuster.
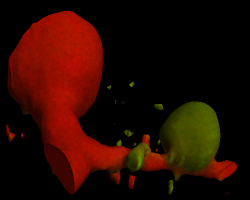
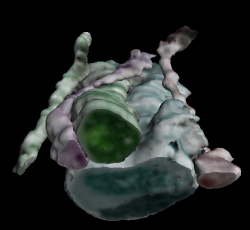
In this mode, the color of reconstructed object reflects precisely that of the original data. This mode is available only if the video card of your Macintosh supports 3D texturing. If the video card is not capable of 3D texturing, Texture Mapping menu is grayed out and is not selectable.
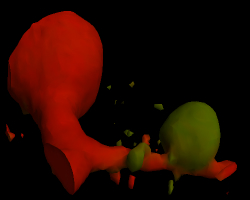
Objects are drawn by assigning color to each vertex of polygons defining the boundary surface. If Mesh Size is small enough, objects are reconstructed quite faithfully with color of the original data. This mode is selected automatically if the video card is not capable of 3D texturing.
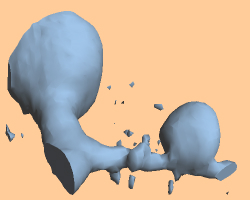
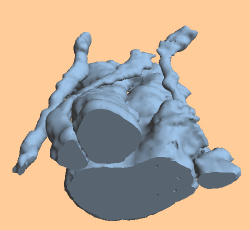
Objects are drawn regardless of the original color. In such cases as reconstruction from CT and MRI images where the surface color has no specific meaning, this option combined with selection of appropriate light and background colors using Color Adjuster may produce good results.
Texture Mapping |
Vertex Color |
None |
|
|
|
|
|
|
Shown above is a comparison of different material coloring modes. With Texture Mapping, more detail is shown and the mouse rotation is also smoother. So there is no reason why you should choose Vertex Color. If you use DeltaViewer seriously, we recommend using a video card capable of 3D texturing. For more on video cards, please see System Requirements section of About DeltaViewer.
Choosing Color Adjuster menu shows the color adjuster on the right of 3D view. You can make Red, Green and Blue components of the object and background brighter or darker independently. You can also move the sliders simultaneously by pressing Command key.
When the image size is very large, adjustment of brightness could take tens of seconds. This is because DeltaViewer recomputes texture and vertex colors each time brightness is changed. The color of object and background can be adjusted in realtime.
The direction of light can be changed. Hold down the Control key,
and the cursor changes to ![]() .
Then click anywhere in the window. You can even drag the mouse to change the
lighting direction continuously, but it may not be done smoothly, since DeltaViewer
recomputes the 3D image every time you move the mouse.
.
Then click anywhere in the window. You can even drag the mouse to change the
lighting direction continuously, but it may not be done smoothly, since DeltaViewer
recomputes the 3D image every time you move the mouse.
If you use DeltaViewer it soon becomes obvious that still image and animated image have totally different amount of information. When a rotating image is put to rest, one immediately loses sense of depth. However, there are times when you need still images. Use Save Screenshot menu in such a case.
Save Screenshot captures the current image shown in the window and saves it as an image file. The image size will be the same as that of the window; use Window Size menu if you want to fine adjust the resulting image size.
DeltaViewer does not support printing directly. If you need to print out the 3D view, save screenshot first, and then use Preview, Photoshop, etc. to print it.

You can save the rotating object shown in 3DView as a QuickTime movie, and play it back later without DeltaViewer, or even on non-Macintosh computers.
Display whatever you want in 3DView and rotate it as you like. Using the Window Size menu, adjust the window size to the size of the movie you want to create. Now, select Save QuickTime Movie menu. A dialog box appears and asks you to supply the number of frames and the frame rate. After you specify the filename, a movie containing one full rotation fo the object is created and saved to disk.
If you need to convert the QuickTime movie to AVI format for instance, use QuickTime Player Pro. QuickTime Player Pro is a small-fee upgrade from QuickTime Player which is included in every MacOS distribution.
A 3DView data of DeltaViewer 2 contains as part of it the texture data, which is the same as pixel color data of the rectangular region bounded by the yellow lines in SectionView. You can write out the texture data as a series of 2-dimensional images by Export Texture Data menu. DeltaViewer 1 data has no texture information, thus Export Texture Data cannot be applied to it.